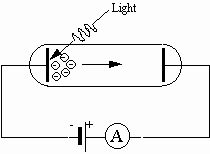
Fig. 1: Principal setup for the photoelectric effect
The Photoelectric
Effect
Equipment used:
photocell and filters, mercury lamp, capacitor, high input impedance operational amplifier, personal computer
Objectives:
A) to interpret the photoelectric effect in terms of the particle nature of light
B) to use a photocell interfaced to a personal computer to measure the frequency dependence of the stopping potential, and to import the data into a spreadsheet to determine Plancks constant and the work function of the photocathode
C) to consider how modifying the
way measurements are made can improve the experimental results
References:
R. Serway, C. Moses, and C. Moyer,
Modern
Physics, Second Edition, Sauders College Publishing, Forth Worth, Texas
(1997).
J. Taylor and C. Zafiratos, Modern
Physics for Scientists and Engineers, Prentice Hall, Englewood Cliffs,
New Jersey (1991).
H. Ohanian, Modern Physics,
Second Edition, Prentice Hall, Englewood Cliffs, New Jersey (1995).
K. Krane, Modern Physics,
Second Edition, John Wiley & Sons, New York (1996).
Particle Nature of Light
Many experiments show that light has the nature of waves. However, some experimental results are best explained by assuming that light also has the nature of particles. This experiment investigates the photoelectric effect, which can be understood in terms of the particle nature of light.
Much of the initial confirmation of the wave nature of electromagnetic radiation is attributed to experiments performed by Heinrich Hertz around 1888. Hertz produced and detected electromagnetic radiation and explained his findings in terms of electromagnetic waves. His efforts verified Maxwells wave model of electromagnetic radiation. Interestingly, Hertz observed an effect involving electromagnetic radiation that cannot be explained by a wave model. During the course of his experimentation Hertz noticed that ultraviolet radiation falling on a metallic surface caused electrons to be ejected from the metal. This effect is termed the photoelectric effect. The wave model fails completely in explaining the photoelectric effect. An experimental setup for studying the photoelectric effect is depicted in Fig. 1.
Fig. 1: Principal setup for the photoelectric effect
A potential difference is applied between two metallic electrodes mounted inside an evacuated glass tube. When the electrode connected to the negative terminal of the potential difference is irradiated with ultraviolet light, electrons are ejected from the electrode. These electrons are attracted to the other electrode, which is connected to the positive terminal of the potential difference. The electric current produced by electrons attracted to the positive electrode can be detected by an ammeter in the circuit. The following results are obtained:
2. The electrons emerge with varying kinetic energy. However, the maximum energy of the electrons does not depend on the intensity.
3. No matter how feeble the intensity of the light, electrons are ejected essentially instantaneously.
4. If the frequency of the radiation falls below a minimum value, called the threshold frequency, there are no electrons ejected no matter how intense the radiation.
5. If the metallic surface is changed, then the threshold frequency changes.
Clearly, electrons are bound in a metal; we do not see electrons "jumping" spontaneously from metal surfaces. Work must be done to free an electron from a metal. The deeper the electron is in the metal, the greater the work that has to be done to remove the electron. The minimum energy is for an electron at the surface of the metal. This minimum energy is termed the work function and is given the symbol f. Einstein assumed that when light strikes a metal, a single photon interacts with a single electron. The full energy of the photon is transferred to the electron. An electron which escapes from the metal has the full energy of the photon minus the work required to free the electron from the metal:
electron energy = hf - work to remove the electron.
Hence, the maximum energy of an escaping electron is the full energy of the photon minus the minimum work to remove the electron.
maximum electron energy = hf - minimum work.
This minimum work is the work function f. Hence
![]()
When the potential difference is applied as shown in Fig. 1, the direction of electric force on the electrons is from the negative electrode toward the positive electrode. Hence, positive work is done on the electrons by the electric force as they move toward the positive electrode. Suppose that we reverse the polarity of the potential difference, as in Fig. 2.
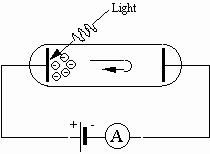
Fig. 2: Photoelectric effect with reverse polarity
Then the electrons released by the photoelectric effect are urged back toward the plate from which they were released. For those electrons that make it to the negative electrode the electric force is opposite to the direction they travel, so negative work would be done by the electric force. The work done on an electron is W = eV, where e is the charge of the electron and V is the potential difference. If the work is just equal in magnitude to the maximum kinetic energy of the electrons, then no electrons would make it to the negative plate and the current registered by the ammeter would drop to zero.
The potential difference required to reduce the current to zero is termed the stopping potential. We can measure the stopping potential by increasing the potential difference from zero and observing the current. When the current drops to zero, we record the value of the potential difference. Replacing the maximum kinetic energy in the photoelectric equation by eV, where V is the stopping potential, we have
![]()
or
![]()
If we measure V for a variety of frequencies and plot V versus f, then a plot is a straight line of slope h/e and intercept -f/e. Knowing that e = -1.60x10⁻¹⁹ Coulombs, we can determine Plancks constant h and the work function f. This is what you will do.
Experimental Method
A capacitor plays a central role in this experiment. Remember, a capacitor is a device for storing electric charge. Basically it consists of two metal plates separated by an insulator. The capacitor is charged by extracting electrons from one plate and transferring them to the other plate. One plate acquires a net negative charge, and the other acquires an equal amount of charge with positive sign. If the insulator between the plates is perfect and there is no other electrical path, such as a wire between the plates, the charge will remain forever on the plates. In a good electronics capacitor, the insulator is of sufficient quality that if we are careful about other electrical connections between the plates, the charge will remain on the plates for a period of the order of hours. Usually we think of charging a capacitor by connecting a battery to the plates. in this experiment we will use the photoelectric effect to do the charging, and we will use a scheme that allows the charge to remain on the capacitor once it is charged.
A photoelectric cell (photocell, for short) consists essentially of two metal electrodes in an evacuated glass tube. Electrical connections are provided to the two electrodes, which are termed the photocathode and the anode. Electrons are ejected from the photocathode when it is illuminated with radiation having at least a minimum frequency which depends on the material of the photocathode. Suppose that we connect a capacitor in parallel with a photocell as shown in Fig. 3.
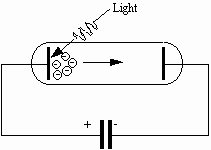
Fig. 3: A capacitor is charged by electrons ejected by light shining on the photocathode.
Some electrons ejected from the photocathode are directed toward the anode, which is connected electrically to one plate of the capacitor. These electrons are collected on the anode, and the capacitor acquires charge, The acquisition of charge produces a potential difference across the capacitor. This same potential difference appears between the anode and photocathode; the anode is negative (and hence tends to repel electrons), and the photocathode is positive. When the potential difference across the capacitor equals the stopping potential for the most energetic electron, the capacitor stops charging. Thus the stopping potential can be measured by recording the potential difference across the capacitor when it is fully charged.
Any voltmeter used to record the potential difference across the capacitor has some electrical resistance associated with it. This resistance provides a discharge path for charge stored in the capacitor. To get a meaningful measurement of the stopping potential, the resistance of the voltmeter must be very large. In this experiment, we are going to use an operational amplifier as the voltage sensitive device. For now you need only know that the amplifier has two input terminals, where the potential difference to be measured is connected, and two output terminals, where the potential difference is read. What is important about this arrangement is the resistance between the input terminals is about 1012 Ohms. Thus very little charge leaks off the capacitor during the charging process.
The potential difference across the output of the operational amplifier is fed to an analog-to-digital converter, which produces a digital signal for use by the computer. A program in LabVIEW has been written to record the data and store them in a file. You can then import, analyze, and plot the data with the use of a Quattro Pro spreadsheet.
At your station you will see a mercury-vapor light source and a box containing the photocell and light filters. Each filter is labeled with the shortest wavelength it is intended to pass; the "390.6 nm filter" is actually an empty space to allow this ultraviolet wavelength to pass. The light source should be placed a few centimeters from the filters, which are inserted in front of the photocell.
The computer program guides you through the process of taking data. There will appear on the screen a message telling you to choose a particular filter. Prior to taking measurements, you discharge the capacitor with a push-button switch located on the circuit board. You record the potential difference as the capacitor begins to charge. You will see the potential difference build up and then level off when the capacitor becomes fully charged, indicating that the stopping potential has been achieved. For each wavelength, the program guides you to record three values of the stopping potential, which will be averaged in the spreadsheet.
With the spreadsheet you perform a linear regression, fitting a straight line to the data on stopping potential V versus frequency of the incident light.
![]()
From the slope and intercept the spreadsheet computes Plancks constant h and the work function f.
Though the spreadsheet has been set up for you, with many calculations made automatically, take time to notice exactly what the spreadsheet is doing. Read the cell contents, and make sure that you understand the calculations that are done. If youre not already expert with spreadsheets, this practice will be helpful when you need to create your own spreadsheets later.
1. The spreadsheet reports a value of h with 5 significant figures. Just as the value of h follows from the slope of the regression line, the uncertainty in h follows from the uncertainty in that slope. The spreadsheet computes and reports the uncertainty in h. In view of the value of this uncertainty, how many significant figures in h should you retain?
2. You will find that you can get a value for h in just a few minutes by following the procedure outlined above. The speed of getting a result, instead of sanctioning your packing up and going home early, frees you to think about experiment design. Unless you have been very careful, you have found that your result for h differs, by much more than your claimed uncertainty, from the carefully measured value of h = 6.62618x10⁻³⁴J s. The problem is to improve your result.
Recall that experimental errors come in two kinds: random error and systematic error. Even with careful observation, repeated measurements of the same quantity give slightly different values, which vary at random. A simple example might be using a meter stick to measure the width of the computer monitor; random errors in the measured width might arise from accidental variation of the angle from which the meter stick is read. Making a measurement several times and averaging the results is intended to allow for random error. Thats why you take three readings of the stopping voltage at each frequency in this experiment. Systematic errors occur when there is a bias in the way the measurements are made. In our example, if the width of the monitor is measured from the end of the meter stick, but the first centimeter of the meter stick had been cut off, there will be a systematic error in the result. You should consider whether systematic error has caused your value for h to be off.
Here are some questions, some of which may be relevant to help you decide if you are taking data in such a way as to bias the results.
Was the capacitor fully charged when the computer recorded the potential difference? (It records V immediately after completing the plot of capacitor voltage versus time.)
Does light hit the anode of the photocell? (Light which hits the anode may eject photoelectrons from it; they would be repelled from the anode and tend to reduce the charge on the capacitor, thus causing the recorded potential difference to be too low.)
Is some of the ultraviolet radiation from the lamp absorbed before it reaches the photocell?
3. Print your spreadsheet, including your final graph of V versus f. Does your final result for h agree with the accepted value within your experimental uncertainty?
4. From the intercept of the regression line, the spreadsheet computes the value of the work function f. With the intercept in volts, then f = [V(f=0)] x e is in units of electron volts, where 1 eV = 1 Volt x e = energy acquired by an electron in falling through a potential difference of 1 Volt. The work function is the energy required to tear an electron out of the surface of the metal photocathode. For comparison, the energy required to tear the electron out of an isolated hydrogen atom is 13.6 eV. Does your value for f seem reasonable?
With [V(f=0)] in Volts, plug in the value of e in Coulombs. Report the result, which is the value of f in joules.
| This document was last modified on Tuesday, 29-Aug-2000 23:09:50 EDT
and has been accessed [an error occurred while processing this directive] times. Address
comments or questions to:
or yarrisjm@muohio.edu |